Python版のMPI
RaspberryPiスパコン(2)のパッケージのインストールで、必要なものをまとめてインストールした。このときは、『Raspberry Pi でスーパーコンピュータをつくろう!』を参考にしたので、CやFortranでのスパコン的な並列処理をするためのパッケージを入れた。
しかし、今は、Pythonだけで並列処理をやろうとしているので、PythonのMPIパッケージをインストールしないといけない。
MPI for Python というサイトがあるので、その説明に従ってインストールしよう。その中に、Installationのページがあるので、それに従えばよいだけだ。
非常に簡単で、以下のコマンドでインストールできる。
$ python -m pip install mpi4pyMPI版 Hello world
これは、Hello World のMPI/Python版である。
from mpi4py import MPI

comm = MPI.COMM_WORLD
rank = comm.Get_rank()
size = comm.Get_size()

print(f"Hello, world! from rank {rank} out of {size}")
まず、最後のprintの中の f文字列について説明しておこう。
fに続く文字列の中に {変数} があれば、その変数の値に置き換わる。
hello.py では、rank と sizeの値を知りたいので、それらを{}の中に書いておいた。
MPIでは、プログラムが動く独立した単位をノードという。ノードのことを、CPUといったり、プロセスと言う場合もある。MPIの場合、各ノードは別々のマシンでもよいし、同じマシンで複数ノードが走っても良いが、それぞれのノードは別々のメモリ空間となる。マルチスレッドの場合、複数のスレッドが共通のメモリ空間を共有するので異なることに注意しよう。
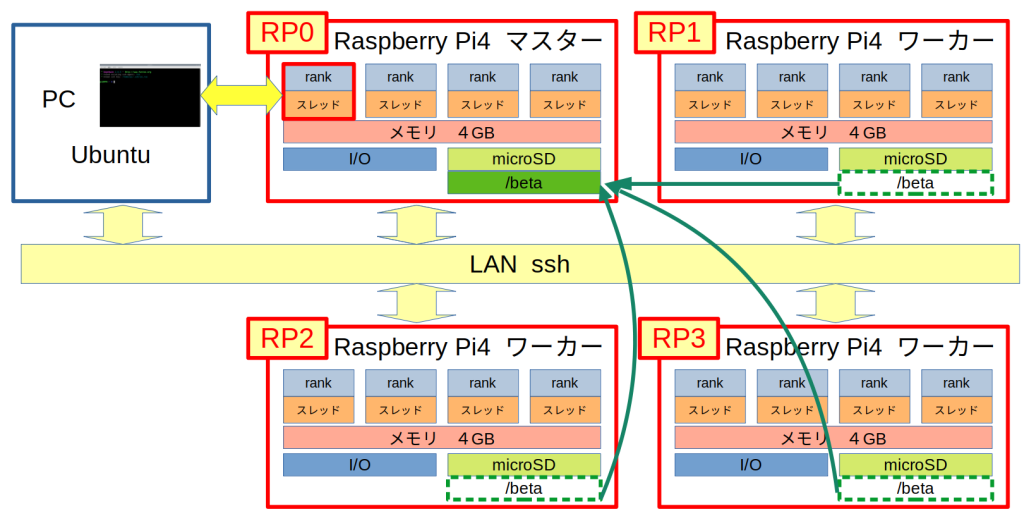
Raspberry Pi 4 の場合、4つのコアがあり、4スレッド動くので、1ノードを1コア、1プロセスに対応するので、それぞれのマシンで4ノード(4並列)走らせることができ、2台で8ノード(8並列)の実行が可能である。
hello.py は、そのようなことを調べるためのプログラムである。
では、実行してみよう。
$ mpiexec -H RP0,RP1 python3 hello.py
Hello, world! from rank 0 out of 2
Hello, world! from rank 1 out of 2
$
python3 hello.py だけでhello.py が動くのだが、その前にMPIを動かすためのオマジナイが並んでいる。
mpiexec (または mpirun)は、コマンドラインからmpiを起動する。
そのとき、-H の後ろに、マシン名またはIPを並べると、それらのマシンで同じプログラムが実行される。
RP0,RP1 と2つ指定したので、2ノードになり、RP0で1ノード、RP1で1ノードが起動する。
rankの番号は0から順に振られ、各ノードは自分が何番のノードか知ることができる。
MPI.COMM_WORLDは、コミュニケータというもので、大量のノードを作り、ノードを群管理する場合に自前のコミュニケータを作って行うのだが、簡単な並列処理を行うだけなら、デフォルトのMPI.COMM_WORLDを使うだけで十分である。なので、コミュニケータの説明はこれでオシマイとする。
8ノードで動かした場合を示す。8ノードが同時に動くので、どの順番に表示されるかは分からない。
$ mpiexec -H RP0,RP0,RP0,RP0,RP1,RP1,RP1,RP1 python3 hello.py
Hello, world! from rank 5 out of 8
Hello, world! from rank 6 out of 8
Hello, world! from rank 7 out of 8
Hello, world! from rank 4 out of 8
Hello, world! from rank 0 out of 8
Hello, world! from rank 1 out of 8
Hello, world! from rank 2 out of 8
Hello, world! from rank 3 out of 8
$ mpiexec -H RP0,RP0,RP0,RP0,RP1,RP1,RP1,RP1 python3 hello.py
Hello, world! from rank 5 out of 8
Hello, world! from rank 7 out of 8
Hello, world! from rank 4 out of 8
Hello, world! from rank 1 out of 8
Hello, world! from rank 0 out of 8
Hello, world! from rank 3 out of 8
Hello, world! from rank 2 out of 8
Hello, world! from rank 6 out of 8
$
ホスト名も取得してprintしてみよう。
from mpi4py import MPI
import socket

host = socket.gethostname()

comm = MPI.COMM_WORLD
rank = comm.Get_rank()
size = comm.Get_size()

print(f"Hello, world! from {host} rank {rank} out of {size}")
$ mpiexec -H RP0,RP0,RP0,RP0,RP1,RP1,RP1,RP1 python3 hellohost.py
Hello, world! from RP1 rank 5 out of 8
Hello, world! from RP1 rank 6 out of 8
Hello, world! from RP1 rank 7 out of 8
Hello, world! from RP1 rank 4 out of 8
Hello, world! from RP0 rank 0 out of 8
Hello, world! from RP0 rank 2 out of 8
Hello, world! from RP0 rank 3 out of 8
Hello, world! from RP0 rank 1 out of 8
$これで、各ランクがどちらのマシンで走っているかが分かるだろう。
hostfile
ホスト名を延々と書き並べるのは面倒である。そのために、ホスト名および各ホストでいくつ走らせるかを指定たhostfileというものを用意することができる。
RP0 slots=4
RP1 slots=4
ホスト名と、そのホスト上で動かすノード数を指定する。
これで実行すると、以下のようになる。
alpha@RP0:/beta/Study/MPI4PY $ mpiexec -hostfile host2x4 python3 hellohost.py
Hello, world! from RP1 rank 7 out of 8
Hello, world! from RP1 rank 4 out of 8
Hello, world! from RP1 rank 5 out of 8
Hello, world! from RP1 rank 6 out of 8
Hello, world! from RP0 rank 3 out of 8
Hello, world! from RP0 rank 0 out of 8
Hello, world! from RP0 rank 1 out of 8
Hello, world! from RP0 rank 2 out of 8
alpha@RP0:/beta/Study/MPI4PY $
これで、以前示した図がよく分かるかと思う。

8台全部繋ごう
2台繋ぐことができれば、ワーカーマシン(RP1)のmicroSDカードをコピーして、RP2〜RP7のmicroSDカードを作ろう。マシン名、IPの設定を変更するだけだ、ということで説明は省略する。
8台を全部つないだら、MPIがちゃんと動くかどうか試してみよう。
$ mpiexec -H RP0,RP1,RP2,RP3,RP4,RP5,RP6,RP7 python3 hellohost.py
Hello, world! from RP2 rank 2 out of 8
Hello, world! from RP7 rank 7 out of 8
Hello, world! from RP3 rank 3 out of 8
Hello, world! from RP1 rank 1 out of 8
Hello, world! from RP4 rank 4 out of 8
Hello, world! from RP6 rank 6 out of 8
Hello, world! from RP5 rank 5 out of 8
Hello, world! from RP0 rank 0 out of 8
$
しかし、ホスト名を延々と並べるのは面倒である。Raspberry Pi 4 を8台つないだ場合、各Raspberry Pi で4ノードを走らせることができるので、全部でMPIのsizeが4×8=32にできるはず。
$ cat host8x4
RP0 slots=4
RP1 slots=4
RP2 slots=4
RP3 slots=4
RP4 slots=4
RP5 slots=4
RP6 slots=4
RP7 slots=4
$ mpiexec -hostfile host8x4 python3 hellohost.py
Hello, world! from RP1 rank 7 out of 32
Hello, world! from RP7 rank 29 out of 32
Hello, world! from RP7 rank 31 out of 32
Hello, world! from RP6 rank 26 out of 32
Hello, world! from RP5 rank 22 out of 32
Hello, world! from RP6 rank 24 out of 32
Hello, world! from RP5 rank 23 out of 32
Hello, world! from RP0 rank 0 out of 32
Hello, world! from RP4 rank 18 out of 32
Hello, world! from RP3 rank 14 out of 32
Hello, world! from RP2 rank 11 out of 32
Hello, world! from RP4 rank 19 out of 32
Hello, world! from RP3 rank 15 out of 32
Hello, world! from RP2 rank 8 out of 32
Hello, world! from RP4 rank 16 out of 32
Hello, world! from RP2 rank 9 out of 32
Hello, world! from RP4 rank 17 out of 32
Hello, world! from RP3 rank 12 out of 32
Hello, world! from RP3 rank 13 out of 32
Hello, world! from RP2 rank 10 out of 32
Hello, world! from RP0 rank 2 out of 32
Hello, world! from RP0 rank 1 out of 32
Hello, world! from RP0 rank 3 out of 32
Hello, world! from RP1 rank 6 out of 32
Hello, world! from RP5 rank 21 out of 32
Hello, world! from RP1 rank 4 out of 32
Hello, world! from RP7 rank 28 out of 32
Hello, world! from RP6 rank 25 out of 32
Hello, world! from RP1 rank 5 out of 32
Hello, world! from RP5 rank 20 out of 32
Hello, world! from RP7 rank 30 out of 32
Hello, world! from RP6 rank 27 out of 32
$
32ノードで動いたようだ。
次から、実際に並列に計算してみよう。


